DAILY NEWS

Stay Ahead, Stay Informed – Every Day

Advertisement
How Android’s Tasker App Stacks Up Against Apple Shortcuts (and How to Use Each One)


If you’re at the stage where you want to do more with your phone and start building automations—customized mini-apps to carry out tasks—then Tasker (for Android) and Apple Shortcuts (for iOS) are likely to be included in the tools you turn to. You’ll find an introduction to both these apps and what they can do for you below, as well as an explanation of how they’re similar and how they’re not. The main difference is that Android continues to allow its apps to dig deeper into the operating system and its features than iOS does, and Tasker can take full advantage.For those who’ve never looked into phone automations, there’s an almost limitless array of possibilities here, all built around the idea of “if this happens, then do that”—so on the most basic level, plugging in your headphones can increase the volume level, or logging into the work wifi can put your phone in silent mode.Tasker has more capabilities than Apple shortcuts but requires more effortEven Tasker’s biggest fans would admit it’s not the easiest app to come to grips with. It’s also going to cost you $3.99, so be sure you’re going to make full use of it before purchasing. Once you’re used to the app, though, you’ll find it’s a powerful and capable piece of software, and there is a simplified “Tasky” interface you can switch to that lets you edit existing automations rather than starting from scratch.
Head to the full Tasker interface, and you can see it’s split into tabs: Profiles (the triggers that make something happen and the linked actions to take), Tasks (actions to carry out that aren’t linked to triggers), Scenes (custom edits to the user interface), and Vars (stored values and settings, like your phone’s battery life). Automations often combine these elements into projects, which can be found along the bottom tab.

Tasker’s triggers and actions take some getting used to.
Credit: Lifehacker

Importing an example project is perhaps the easiest way to get started. Tap the + (plus) button (lower right), then choose TaskerNet and make your pick. When you’ve found something you like, tap the Import button, and it’ll be added to Tasker and set up; you’ll also need to grant the automation all the necessary permissions.There’s a Flip to Shhh automation that you should be able to find in the TaskerNet directory—placing your phone face down will mute it. When you’ve loaded the project, you’ll see it at the bottom of the screen, ready for selecting: Under the Profiles tab, there’s an Orientation Face Down toggle switch (which is what the automation is waiting for), and if you tap on it, you’ll see the linked action—turning on Do Not Disturb. Under Tasks, we have a standalone task, which is the setup for the automation, and you can edit this to change the on-screen message.

Tasks can be coded to go into great detail.
Credit: Lifehacker

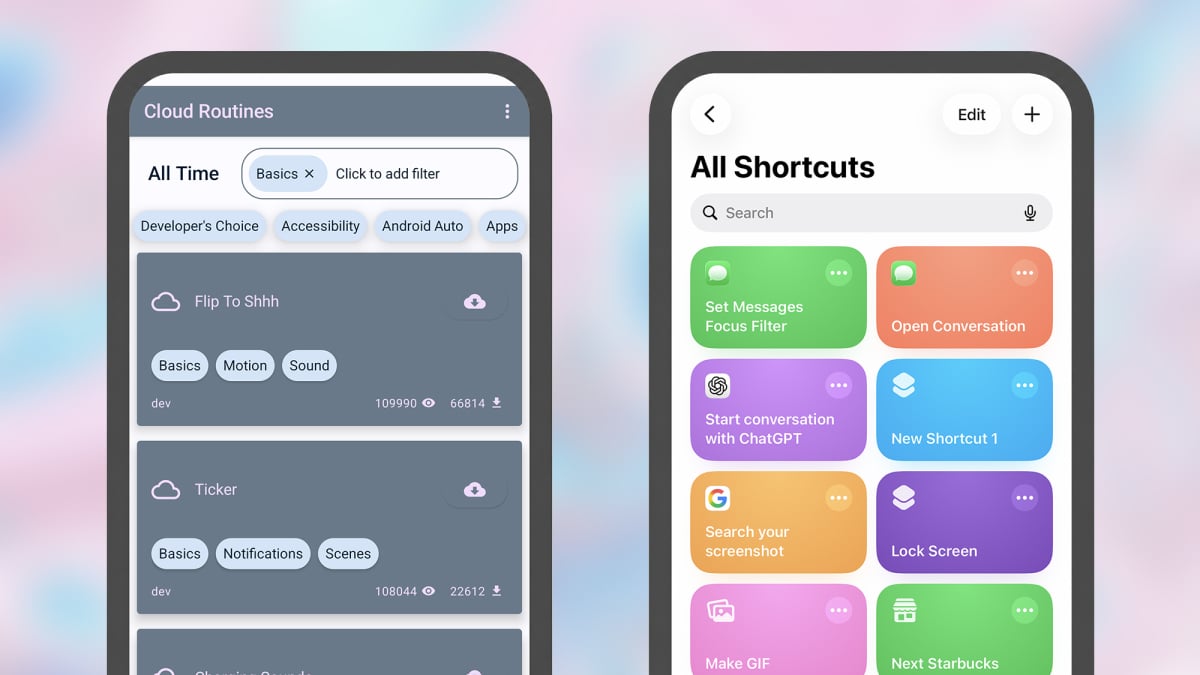
To fully explain Tasker and its idiosyncrasies takes a lot more space than what’s available here—check out the vast amount of information on the Tasker website—but you can start building simple automations from the Profile tab by clicking the + (plus) button and choosing a trigger and an action from the lists provided. You could pick a time as the trigger, and switching to dark mode as the action, for example.If this already seems like too much effort, looking at what Tasker is capable of can encourage you to dive in: Run searches from doodled sketches, get a notification when your WhatsApp message goes from unread to read, or switch to voice typing automatically when your phone is flat on a surface, for example.Apple Shortcuts is easier to learn than Tasker, but you have less controlApple Shortcuts is the iPhone Tasker in some ways, but it’s much more straightforward: Creating and editing automations is simpler, and while there’s less you can do with it in terms of interacting with the fundamentals of your phone, the capabilities here are going to be enough for most casual tinkerers.All of your current shortcuts show up in the Library tab of the app, while under Automations, you can find the shortcuts that run automatically, without any input from you—maybe based on the time of day or the opening of an app. Under Gallery, you can browse through shortcuts curated by Apple.

Shortcuts is easier to understand than Tasker.
Credit: Lifehacker

As with Tasker, starting with an example is a good way to get into the flow of the app. If you open the Gallery, you should be able to find a Remind Me at Work shortcut: Tap the + (plus) button in the corner to add it to your own library. Getting within 100 meters of your office is the trigger, and displaying a reminder is the action.

What do you think so far?

The shortcut will want to know where you work, and will ask for this information when you add it to your library. When the shortcut runs, you get prompted for something to add to a work note inside Apple Notes—so you can build up a comprehensive list of everything you don’t want to forget, specifically for your workplace.

Numerous triggers can be used for automations in Shortcuts.
Credit: Lifehacker

Tap the three dots on any shortcut in your library to see a breakdown of how it works. Triggers can be based on times and dates, locations, apps opening or closing, Focus Modes, or on changes to settings like wifi and Bluetooth. Actions can include a host of tasks in Apple’s own apps (from setting calendar entries to getting map directions), as well as some third-party ones, and you’re also able to control various aspects of the phone, such as changing the Airplane Mode status or screen brightness level.You’ll find plenty of shortcuts written by users and available on the web. These tasks and automations can be set up to track a home move via QR codes, log your daily water intake, or get the weather forecast for the location of an upcoming calendar event. You can also start building your own by tapping the + (plus) button on the Library or Automation tabs.Tasker vs. Shortcuts is Android vs. iOSComparing Tasker against Shortcuts is an interesting way to look at Android versus iOS overall. Even as Google and Apple have borrowed features off each other over the years, there have remained some pretty distinctive differences as well, and many of them come to the fore when using these two tools.Apple Shortcuts gives you a lot of guidance, and offers a workflow that’s easier to follow—though it’s still capable of some very clever automations. It is also more limited in terms of the control you get over the mobile operating system and the apps installed on it: Shortcuts can only dig into apps as much as the developers allow.

Tasker has a steeper learning curve than Shortcuts.
Credit: Lifehacker

Tasker can interact with apps whether or not their developers or Google have done anything to help. Unlike Shortcuts, it can read the content of notifications, draw on top of other apps, and even carry out actions on your behalf (like screen taps and swipes), for example. Tasker can also do continuous monitoring better than Shortcuts can.Apple (understandably) wants to keep some limits on Shortcuts because of security and privacy reasons, but Google puts the onus on you to only run the automations and tasks that you understand and trust. For better or worse, Tasker and Android give you more freedom if you want to truly hack into what your phone is capable of (and are patient enough to figure out the interface).


Source link

How to Train to Run Faster (Not Just Farther)


We may earn a commission from links on this page.

Sometimes I fear my running career has plateaued. Well, not my career, but my pace. I lace up four or five times a week, push hard enough to feel pleasantly wrecked, watch my mileage climb steadily upward, and then—after months of honest effort—still find myself running the exact same pace I was running a year ago. It’s clear that in order to get faster, effort alone isn’t enough. I’m not alone here. It’s well known in running circles that a lot of us unconsciously settle into what coaches call “the gray zone”—an effort level that’s too hard to be truly easy and too easy to create meaningful high-end adaptation. It feels productive, but from a physiological standpoint, you’re collecting fatigue without collecting much additional fitness. I see a lot of competing advice from “runfluencers” online, usually focused solely on everyone’s favorite workout: Zone 2 cardio (and all the ambiguity that entails). However, Zone 2 alone isn’t going to help you break through your plateau. The best way to improve your running can be boiled down like this: Slow down on your easy days, and go harder on your hard days. But understanding why requires a short detour into how your aerobic system actually works.
What “Zone 2” means for your runningIf you’ve been anywhere near running content in the last few years, you’ve heard about Zone 2 training. It’s practically been evangelized, and I get it—who doesn’t want to hear that less effort can yield greater results. The idea has genuine scientific backing, and it’s useful for runners who chronically overtrain. But it’s also become a buzzword that gets thrown around loosely enough to cause confusion.“Zone 2” is a term drawn from the five-zone system of heart-rate training. For runners specifically, this zone translates to “easy pace” or “long slow distance pace.” The tricky thing is that for most recreational runners, this pace is far slower than it feels like it should be. There’s a reason the sort of “moderate intensity” runs I describe above—where you could hold a conversation, but it wouldn’t be comfortable—are sometimes called “junk miles.” It’s not that these miles are without benefit: Running is still good for you! But if you spend the vast majority of your training at “moderate intensity” (or zone 3, or the gray zone, or running junk miles), you’ll struggle to get faster. In order to go intense enough to really push your aerobic ceiling, the rest of your miles need to be easy enough to recover well. If your mission is simply to get some cardio done, you shouldn’t waste your time obsessing over zone 2 versus zone 3 workouts. However, if you’re trying to run faster, you do need to first learn how to run slower. What happens at a truly easy, low-intensity effort is you can lay the aerobic infrastructure that eventually makes everything faster.

What do you think so far?

How to train to run fasterNow, here’s where a lot of runners who’ve heard the “slow down” message go sideways: They take everything easy and wonder why they’re still not improving. Low-intensity volume builds your aerobic base, but it doesn’t push your lactate threshold or teach your legs to turn over quickly. For that, you need real intensity. Running economy—how efficiently your body uses oxygen at a given pace—is one of the strongest predictors of performance. I spent the last month testing and reviewing the Garmin Forerunner 970, and next month I’m adding the HRM-600 chest strap in order to properly test the “running economy” metric. Here are the workouts I’ll be doing to try to improve my running economy:Threshold running. Threshold work (often called tempo running) teaches your body to sustain a comfortably hard effort. Twenty to forty minutes at this effort, once a week, is one of the highest-leverage things a recreational runner can do. It raises the pace at which lactate begins to accumulate, which is another way of saying it makes your “hard” feel easier over time.Interval training. This forces your cardiovascular system to operate near its ceiling. Short, sharp intervals—think 400 to 1,200-meter repeats at a pace faster than your current 5K—improve VO2 max and reinforce good form under fatigue. These should feel genuinely difficult, and as such, they require real recovery. One interval workout a week is a solid start.Strides or short accelerations. Strides are a great way to train your turnover speed. Adding four to six strides after an easy run, two or three times per week, is a low-risk, high-return habit to improve running form and eventually speed.
Remember to train smarter, not just harderI know firsthand that recreational running culture has a complicated relationship with volume. Logging more miles carries a certain social currency, and of course, mileage does matter. But mileage added on top of chronic gray-zone training just adds more gray-zone training. If your 35-mile week is all moderate effort, jumping to 45 miles of moderate effort won’t break your plateau. In fact, it’ll deepen it, and probably bring you closer to injury. The question worth asking isn’t, “How many miles am I running?” but, “What is each of those miles actually doing?”It’s true that around 80% of your runs should feel easy enough to talk in full sentences. But at least once a week, you should be pushing yourself, such as with threshold work or interval training. Add mileage gradually and only when the easy days actually feel easy. For our purposes here, intensity is the point, not quantity. Go truly easy when easy is what’s called for, and truly hard when the session demands it.


Source link

The Beats Studio Buds+ Are $75 Off Right Now


We may earn a commission from links on this page.
Deal pricing and availability subject to change after time of publication.

The Beats Studio Buds+ have been around long enough to feel familiar, but this current deal adds a layer that makes them worth a second look. Right now, they are bundled with two years of AppleCare+ and listed at $123.95 (down from $198.95)—price trackers show this is the lowest this bundle has ever been. Wireless earbuds are easy to misplace, drop, or wear down over time. AppleCare+ extends repair coverage and adds accidental damage protection, which can save you from paying full replacement costs if something goes wrong. For a product that lives in your pocket or gym bag, that safety net has real value. Plus, they carry an IPX4 rating, so sweat or a bit of rain is not a concern.
The Studio Buds+ are a refinement over the older Studio Buds, and the upgrades show up in small but noticeable ways—battery life now stretches to nine hours on a single charge, with the case pushing the total to 36 hours. That means you can go several days without reaching for a charger. The active noise cancellation is also stronger this time, especially for steady background sounds like traffic or a gym environment. It will not block everything, but it does enough to make podcasts and music easier to focus on. Call quality is another area that sees a bump, with microphones that do a better job isolating your voice in busy surroundings, notes this PCMag review.

What do you think so far?

These earbuds also don’t lock you into one type of phone/ecosystem. Apple users get quick pairing and seamless switching, while Android users get support for Google Fast Pair and a dedicated app for controls and updates. You can customize tap functions, switch between noise modes, and even track a misplaced pair. That flexibility makes them easier to recommend across different devices. The main limitation is that while the noise cancellation is strong for the price, it does not match premium models that cost significantly more. Still, at this price, with solid battery life, reliable call performance, and added AppleCare+ coverage, the Studio Buds+ make a great choice for anyone who wants a solid everyday pair of earbuds without spending top-tier money.

Deals are selected by our commerce team


Source link